


GLAM UP YOUR BRIDAL GOWN HANGERS WITH THESE BREATHTAKING DIY IDEAS!
Your wedding is going to be the most exciting event of your life and it's only normal for you to want to add a personal touch to everything you can think of! While you're on the quest to make your big day special in all ways possible, don't overlook the humble clothes hanger. After all, hangers will feature prominently in shots of your bridal gown and bridesmaids' dresses. You certainly can't have plain bridal gown hangers showing in your otherwise perfect wedding, can you?
Apart from adding pizzazz to your wedding photos, personalized hangers can serve as a pleasant surprise for your bridal party and even your groom! Personalized hangers can also act as keepsakes, and if you put some thought into decorating clothes hangers, your bridesmaids are sure to make them a permanent addition to their closets.
So here are some amazing hanger decoration DIY ideas you'll love to try out for your wedding. Bonus: They're easy on the pocket too!
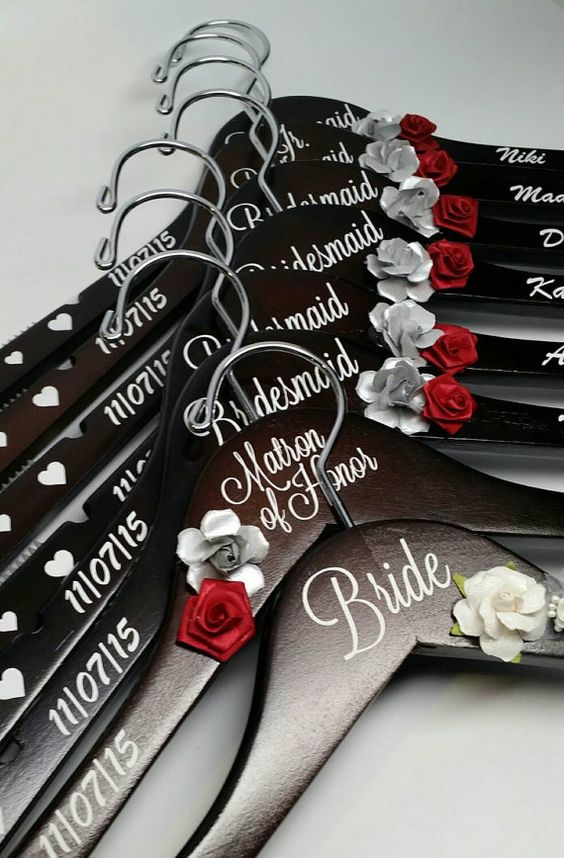
EMBELLISHED WEDDING HANGERS
Embellishments can add interest to otherwise plain hangers and they are sure to take your wedding decor a notch higher! Here are some ideas you could use to embellish bridal gown hangers:
- Cut organza ribbon into strips and form a bow. You can slip these bows over the neck of hangers or affix them at the center with hot glue.
- Make your own fabric flowers or buy ready-made ones and glue them onto hangers.
- If you're having a beach wedding, you can use seashells to embellish hangers! Clean seashells to remove debris before gluing them onto hangers. For bright white seashells, soak them in bleach for a while. Scrub clean and allow to dry before using.
- Use artificial pearls or gemstones with other embellishments.
When mixing and matching embellishments, remember that more is less. Don't overcrowd the hanger by using more than three different embellishments.


WEDDING GOWN HANGERS WITH GALVANIZED WIRE
Hangers with galvanized wire spelling out names or titles of your bridal party members will look magnificent. They are quite easy to DIY if you have time and patience, so don't bother spending a lot by purchasing custom ones online!
Things You Need:
- Wooden hangers
- Galvanized wire-14 gauge
- Needle nose pliers
- Masking tape
- Wire cutter
- Drilling machine
- Glue
Steps:
- Start by writing down names or titles on a paper in a style of your liking. This will serve as a guide as you begin forming the letters. You may want to measure the width of the hangers to help with picking the right font size. You can also look online for some free downloadable fonts and get printouts.
- Cut required length of wire, counting 10-12 inches of wire per letter. Remember to leave a bit of wire on both ends of the words so you can attach it to the hanger.
- Cover the tips of the pliers with a bit of masking tape so as to not scratch the wire as you form letters.
- Shape letters using the pliers and guide; check out this video for some help. With a bit of practice, you'll be able to get a hang of it. If you make a mistake, start afresh instead of re-bending the wire as it will create kinks and look unsightly.
- Drill a hole each on the inside of the arms of the hanger. Trim the wire to fit and fit it in place using glue. Allow to dry!
Use wires of different colors or pick a single color to go with the wedding theme. Gold or copper colored wires will pair nicely with wooden hangers.
You can further dress these hangers up using other ideas from this post!

WEDDING HANGERS WITH PRINTABLE TAGS
Another inexpensive way to deck up bridal gown hangers is to hang some pretty tags on them! There are innumerable free tag designs available online and you can browse through, download and print whichever you like.
You can have different designs for each one of your bridal party members or you can go for a single design that best suits the theme of your wedding. Write the names or titles of your bridal party on the printed tags, or customize tags by downloading and editing the files before printing.
Things You Need:
- Tags printed on white card stock paper
- Scissors
- 1/4th inch wide ribbon
- Glue
Steps:
- Neatly cut out the tags and write names, titles, and other details on them if you haven't customized them.
- Cut the ribbon into strips of 4 inches.
- Form a simple loop out of each strip of ribbon using glue to hold it in place. Glue the loops onto the back of the tags.
- Once dry, slip on the loops over the hanger necks.
Wooden hangers will look pretty with just these personalized tags around their necks. You can also use plastic hangers, but do spruce them up first with paint, sequins or embellishments as discussed in this post!
Tip: Consider writing notes for your bridesmaids on the back of the tags or make separate tags for the same.
Check this link for some ideas!

PRINTED WEDDING HANGERS
Smarten up plain hangers by decorating them with temporary tattoos of your choice. You can create custom designs online and have the tattoos delivered to your doorstep! Go for elaborate designs, simple doodles, wedding details, or names or titles of members of your wedding party.
An even better idea is to decoupage wooden hangers with patterned napkins or decoupage paper. You can also cut out wrapping or textured paper in the shape of the hanger and stick it on the flat surface using Mod Podge.
Things You Need:
- Wooden hangers
- Decoupage paper
- Decoupage glue
- Brush
- Scissors
Steps:
- Discard the white layers of the decoupage paper; you only need the patterned layers.
- Think of how you'll be arranging the pattern on the hangers and cut away parts from the design you don't need.
- Using the brush, apply a thin coat of the glue onto the hanger.
- Arrange the patterned paper on the hanger and smooth out the surface gently so that there are no creases or folds. You may want to use a clean soft brush for this.
- Seal with a second layer of glue and allow to dry for at least an hour.
Once dry, add some extras like bows, pearls or flowers to your hangers!
Tip: To create glitter wedding gown hangers, apply a thin coat of Mod Podge on hangers, cover with glitter and shake away excess. Seal with Mod Podge and allow to dry!


PAINTED WEDDING HANGERS
If you want to keep costs to the bare minimum, just buy a handful of cheap plastic hangers and spiff them up using spray paint. Add embellishments or tags as required.
Note that if you spray paint hangers with them lying flat on plastic, paint will pool around the hangers and dry up to a crust. Place hangers on cardboard or hang them up while spray painting. If placing hangers on cardboard, paint one side first, allow to dry, and then turn over to paint the other side.
You may want to use a spray paint nozzle to make light and even coats easily. Do a couple of light coats instead of one or two heavy coats. Allow hangers to dry and finish off with a clear coat.
You can paint hangers in a single color or more. To create designs or prevent color from getting onto specific areas, you can use masking tape. Alternatively, draw designs on with a marker once you're done spray painting.

SEQUINED BRIDAL GOWN HANGERS
Wooden or plastic hangers can be decked up using sequin trims in gold, silver, or a color of your choice. Again, sequined hangers can be further decorated with flowers, ribbons or tags.
To create your own sequined hangers, all you need to do is wrap the hangers with sequin trim. Dab hot glue onto the hanger at intervals and especially at places where you begin and end wrapping the trim to keep it secure.
Tip: A wider trim can help you get the job done quickly, but you won't be able to go over finer details like strap notches and hooks.

CONCLUSION
A little bit of glam can go a long way and personalized hangers are definitely the thing you need to up the ante at your wedding! With the wonderful ideas in this post, we're sure you can't wait to get started on some DIY. So bring out your creativity and glam up some hangers for your big day.